
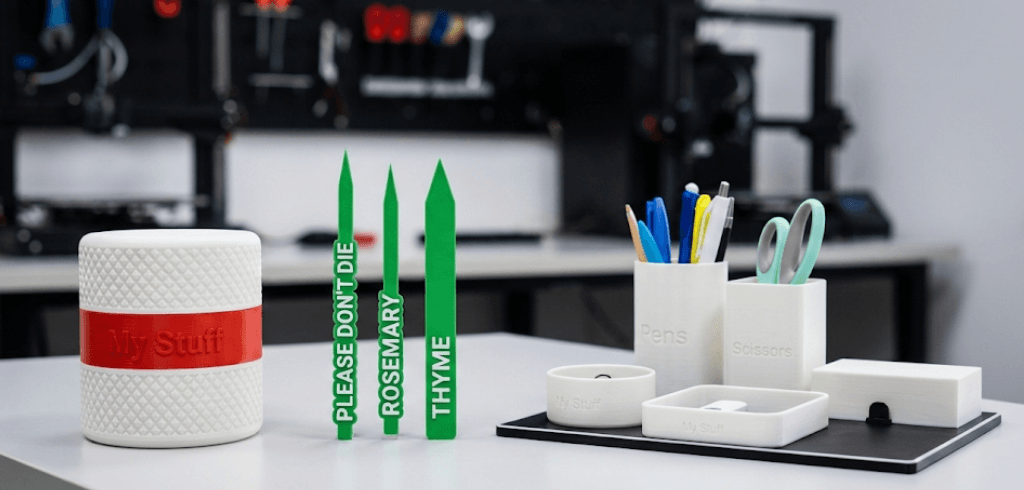
Hi, I’m Fil, and I love the speed and build volume of my K1 Max. It’s a beast. But for a long time, I looked at my Bambu Lab or Creality K2 friends with a little bit of envy over their easy multicolor prints. Well, there are a few new options out there to make my K1 Max multicolor too! It’s not that hard anymore if you are willing to make a little investment, making it sooo much easier to print our Multicolor builds like the Custom Plant Stakes, Desktop Organizer, ScrewTop Container and our very popular Custom Nametag.

Here are a few things to think about
Check your Hotend. Before you buy anything, look at your nozzle. If you have an older K1 Max (pre-2024), you might have the “split” hotend. Most modern upgrades, including the official one, require the “Unicorn” integrated nozzle. If you don’t have it, you’ll need to swap that first.
Prepare your wallet. Unlike the simple pause-and-swap method for single filament printers, true multicolor automation requires hardware. You are looking at a price range of $350 to $500 depending on the route you take.
Understand the waste. Multicolor printing on a single-nozzle machine (like the K1 Max) means purging filament every time you swap colors. This creates “poop” or purge towers. It’s normal, but it costs filament.
Software matters. You may need to update your slicer (Creality Print 5.0+ or OrcaSlicer) to handle the new hardware logic. In all reality you should be keeping your slicers up to date as they can address any security concerns or other bugs.
Ok, now that we’ve laid the ground work, what are the options?
There are really three main paths you can take to get your K1 Max printing in technicolor.
1. The “Universal” Add-Ons (Co Print / Mosaic)
Systems like the Co Print Chroma Set or Mosaic Palette X act as external managers. They splice or manage filament feeding before it even enters your printer.
Pros: Works with almost any printer, not just Creality.
Cons: Can be complex to set up; more tubes and wires cluttering your workspace; calibration can be finicky.
Cost: ~$350 – $600.
2. The “DIY” Route (ERCF)
The Enraged Rabbit Carrot Feeder. Yes, that’s the real name. This is an open-source project you build yourself.
Pros: Cheap hardware cost; infinite customizability; bragging rights.
Cons: Not for the faint of heart. You build it, you tune it, you fix it. It is a project, not a product.
Cost: ~$150 (plus your sanity).
3. The Preferred Solution: Official Creality CFS Upgrade
This is the game-changer. Creality released the CFS (Creality Filament System) and a specific K1 Series Upgrade Kit. It integrates natively with Creality OS and transforms your K1 Max into a machine very similar to the K2 Plus.
Pros: Native integration (screens, software); supports RFID filament recognition; handles up to 4 colors (expandable to 16); reliable filament cutting.
Cons: Requires installing a new extruder (included in the kit); slightly reduces build volume if not managed well.
Cost: ~$50 for the Upgrade Kit + ~$319 for the CFS unit. (Total: ~$370).
How to actually implement the Creality CFS
Since the Creality CFS + Upgrade Kit is the most seamless “native” experience, that is what we are going to install.
Step 1: Gather the Goods
You need to purchase two separate items:
The Creality CFS Unit: This is the box that holds the 4 spools.
The K1 Series CFS Upgrade Kit: This is crucial. It contains a new extruder with a filament cutter, a hub, and cables. You cannot use the CFS without this specific kit on a K1 Max.
Step 2: Swap the Extruder
The stock K1 Max extruder lacks a filament cutter, which is required for automatic swapping.
Unload any filament and power down.
Remove the toolhead cover and the three screws holding the old extruder.
Disconnect the motor cable and PTFE tube.
Install the New Extruder from the Upgrade Kit. It drops right in but has the mechanical cutter built-in. This ensures the filament is cut cleanly before being pulled back to the CFS.
Step 3: Install the Hub and CFS
The kit comes with a communication hub (often mounts to the back or side).
Connect the hub to the printer’s mainboard (usually via the designated expansion port or USB interface provided in the kit).
Connect the CFS unit to this hub using the single data/power cable.
Pro Tip: Plan where your CFS will sit. The K1 Max is tall; placing the CFS on top requires a riser (often printable) or a sturdy shelf next to it.
Step 4: Firmware Update
This is the step most people forget.
Use the USB drive included in the kit (or download the latest Creality OS).
Update the printer’s firmware. The new firmware “unlocks” the multicolor UI on your touchscreen, allowing you to see the 4 spools and assign colors.
Step 5: Slice and Verify
Open Creality Print (ensure you are on the latest version).
Select “K1 Max + CFS” in the printer settings.
Import your model.
Right-click the model to “Clone” or just import multiple parts.
Use the filament mapping tool to assign “Extruder 1, 2, 3, or 4” to different parts of the model.
Slice it and check the preview. You should see a “purge tower” appear on the plate. This is good! It means the printer knows to clean the nozzle between colors.
Ready for Multicolor printing on your K1 Max?
Once you hit print, the K1 Max will handle the rest. It will cut the filament, retract it, feed the new color, purge the old color, and continue printing. It’s mesmerizing to watch.
Give this a try and let us know how it worked or if you have any other ideas for making awesome 3D prints.
Once you have that set up, check out our article on how to print in multicolor.
Continue Exploring!

Hi, I'm Fil, and not all of us are lucky enough to have a multi color 3D printer. When you have them, they are great, but sometimes you really want [...]
-
Hi, I'm Fil, and not all of us are lucky enough to have a multi color 3D printer. When you have them, they are great, but sometimes you really want [...]